Par Annie
Aujourd'hui je vous présente une création d'inspiration Shabby Chic réalisé sur un Shadow Box Tray de 7Gyspies.
C'est l'occasion idéale de mettre les ornements en reliefs ! Sous plusieurs, j'ai ajouté jusqu'à 5 à 6 mousses autocollantes 3D...
Matériel/Supplies :
Papiers/Papers : Bo Bunny, Basic Grey, Cosmo Cricket, October Afternoon
Étiquettes/Tags : October Afternoon, Making Memories
Fleurs & feuilles / Flowers et leafs : Prima &, Center Kisses
Ruban dentelle/Ribbon : Prima
Pierres/Rhinestones : Prima
Perles/Pearls : Prima
Colle scintillante/Stickles : Ranger
Autres : Clôture, lettrage, fleurs fait à la main, Shadow box tray.
Affichage des articles dont le libellé est Misty. Afficher tous les articles
lundi 8 novembre 2010
lundi 25 octobre 2010
Just love You
Par Annie
Matériel/Supplies :
Papiers/papers : Crate Paper / Restoration
Étiquettes/Tags : Crate Paper / Restoration
Lettrage/Alpha : Basic Grey
Fleurs/Flowers : Prima
Feuilles/Leaves : Prima
Perles/Pearls : Prima
Matériel/Supplies :
Papiers/papers : Crate Paper / Restoration
Étiquettes/Tags : Crate Paper / Restoration
Lettrage/Alpha : Basic Grey
Fleurs/Flowers : Prima
Feuilles/Leaves : Prima
Perles/Pearls : Prima
jeudi 21 octobre 2010
Nouvelle venue
Par Annie
Matériel/Supply :
Papiers/papers : Crate Paper - Restoration
Embellissements/Embelishments : Crate Paper - Restoration
Lettrage/Alpha : Basic Grey
Perles/Pearls : Prima
Encre/Ink : ColorBox
Matériel/Supply :
Papiers/papers : Crate Paper - Restoration
Embellissements/Embelishments : Crate Paper - Restoration
Lettrage/Alpha : Basic Grey
Perles/Pearls : Prima
Encre/Ink : ColorBox
jeudi 30 septembre 2010
Dernière année dans la vingtaine
Par Annie
Matériel/Supplies :
Papiers/Papers : Crate Paper - Restoration
Étiquettes/tags : Crate Paper - Restoration
Lettrage/Alpha : mini stickers Cosmo Cricket
Encre/Ink : colorbox
Autre : lettrage jaune
Matériel/Supplies :
Papiers/Papers : Crate Paper - Restoration
Étiquettes/tags : Crate Paper - Restoration
Lettrage/Alpha : mini stickers Cosmo Cricket
Encre/Ink : colorbox
Autre : lettrage jaune
jeudi 23 septembre 2010
Embellir son quotidien
par Annie
Plusieurs le savent déjà, le scrapbooking peut s'élargir au delà de la composition de pages avec photos. Des minis albums, des objets altérés et bien sûr, tous les petits objets de notre quotidien qui peuvent être apprêtés à saveur de scrapbooking ! Many already know that scrapbooking can expand beyond the composition of layouts with pictures. Mini-albums, altered items, and of course, all the small objects of everyday life that can be personalized with scrapbooking supplies!
C'est sur cette inspiration que je vous présente aujourd'hui des objets du quotidien altérés à la saveur "Hambly screen print", ainsi qu'une de mes créations. It is this inspiration that I present today everyday objects altered with Hambly screen prints, and one of my creations.
Source : Hambly blog
Transparents sur un abat-jour :
Et voici maintenant ma création pour ma scraproom, une horloge altérée :
Lettrage/Alpha : American craft - Rootbeer Float
Autre/Others : horloge récupérée, Pébéo, papier lime.
Plusieurs le savent déjà, le scrapbooking peut s'élargir au delà de la composition de pages avec photos. Des minis albums, des objets altérés et bien sûr, tous les petits objets de notre quotidien qui peuvent être apprêtés à saveur de scrapbooking ! Many already know that scrapbooking can expand beyond the composition of layouts with pictures. Mini-albums, altered items, and of course, all the small objects of everyday life that can be personalized with scrapbooking supplies!
C'est sur cette inspiration que je vous présente aujourd'hui des objets du quotidien altérés à la saveur "Hambly screen print", ainsi qu'une de mes créations. It is this inspiration that I present today everyday objects altered with Hambly screen prints, and one of my creations.
Source : Hambly blog
Rub-ons sur un bouton :
Sur une machine à coudre :
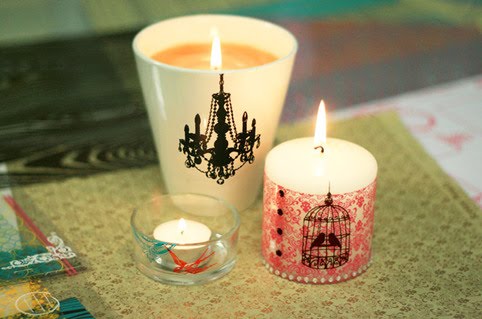
Le verre, les chandelles :
cellulaires, iphone, ipad, portables, ipod...
Sur toile/canvas :
pendentifs, bracelets, bijoux :
Des décos de Noel :
Découpes transparentes sur un mur :
Transparents sur un abat-jour :
Et voici maintenant ma création pour ma scraproom, une horloge altérée :
Matériel/Supplies :
Transparent : Hambly
Autocollants/stickers : HamblyLettrage/Alpha : American craft - Rootbeer Float
Autre/Others : horloge récupérée, Pébéo, papier lime.
jeudi 9 septembre 2010
Fortune cookie… boîte de la fortune !
Par Annie
Aujourd’hui, je vous propose un petit projet pas-à-pas assez amusant et quand même simple. Il s’agit d’une petite boîte « take-out » comme on retrouve dans les restaurants chinois, Évidemment, il est possible d’en acheter une toute faite et de l’altérer, mais ici, elle sera 100% fait à la main. Today, we're making a very simple and fun project. It's a "take out" box, such as those found in Chinese restaurants. Of course, it is possible to buy a ready-made box and to alter it, but here it is 100% handmade.
Voici la démarche / Step by step :
1. Déterminer la taille désirée de la boîte.
1. Determine the desired size of the box.
J’ai d’abord essayé de me faire un montage à partir d’une seule pièce de carton 12x12, mais ce n’était pas assez grand à mon goût. J’ai donc opté pour 5 pièces détachées. First I tried to make a montage from a single piece of 12x12 cardstock, but it was not big enough for my taste. So I opted for 5 pieces.
2. Tracer les pièces dans un carton (ou un bazzill) puis découper le contour des formes.
2. Trace the pieces on cardboard (or a Bazzill), then cut the outline of shapes.
3. Avec le ScorePal ou un autre outil, creuser les traits aux endroits prévus pour le pliage.
3. Using the ScorePal or a similar tool, score the folding lines.
5. Coller le papier à motif, puis assembler les côtés de la boîte avec de la colle très résistante. * J’ai maintenu les petites bandes ensemble à l’aide de trombones, le temps que la colle sèche. 5. Glue the patterned paper, then assemble the sides of the box using heavy-duty glue. * I kept the small strips together using paper clips, while the glue was drying.
6. Insérer et coller la base du dessous.
6. Insert and glue the bottom piece.
Poignée et fermoir / Handle and clasp :
On top of the box, I traced a semicircle and a slot below in order to close the box.
Alors voilà, il ne vous reste qu’à fabriquer de jolis biscuits chinois/ « fortune cookies » avec des petits mots à l’intérieur / Now all you need are fortune cookies, with your own message inside :
- Souhaits d'anniversaire / Birthday Wishes;
- Souhaits pour l’année à venir / Wishes for the coming year;
- Mots doux pour tous les jours / Sweet words for every day;
- etc. !
Le tutoriel des biscuits chinois se trouve sur le blog de Hambly Studio Screen Print.
The fortune cookies tutorial is on Hambly Studio Screen Print blog.
Bonne journée à tous !!
Have a good day !!
Matériel/Supplies :
Papiers/Papers :
Carton Bazzill / Bazzill cardstock
October Afternoon - Thrift Shop
Autre/Other :
ruban/ribbon, cordeline
Aujourd’hui, je vous propose un petit projet pas-à-pas assez amusant et quand même simple. Il s’agit d’une petite boîte « take-out » comme on retrouve dans les restaurants chinois, Évidemment, il est possible d’en acheter une toute faite et de l’altérer, mais ici, elle sera 100% fait à la main. Today, we're making a very simple and fun project. It's a "take out" box, such as those found in Chinese restaurants. Of course, it is possible to buy a ready-made box and to alter it, but here it is 100% handmade.
Voici la démarche / Step by step :
1. Déterminer la taille désirée de la boîte.
1. Determine the desired size of the box.
J’ai d’abord essayé de me faire un montage à partir d’une seule pièce de carton 12x12, mais ce n’était pas assez grand à mon goût. J’ai donc opté pour 5 pièces détachées. First I tried to make a montage from a single piece of 12x12 cardstock, but it was not big enough for my taste. So I opted for 5 pieces.
2. Tracer les pièces dans un carton (ou un bazzill) puis découper le contour des formes.
2. Trace the pieces on cardboard (or a Bazzill), then cut the outline of shapes.
3. Avec le ScorePal ou un autre outil, creuser les traits aux endroits prévus pour le pliage.
3. Using the ScorePal or a similar tool, score the folding lines.
4. Décorer chaque côté avant de les assembler. Dans ce cas-ci, j’ai opté pour deux papiers à motifs de la collection Thrift Shop d’October Afternoon, que j’ai coupés légèrement plus petits pour voir la base en carton. 4. Decorate each side before assembly. In this case, I opted for two patterned papers from the October Afternoon Thrift Shop collection, that I cut slightly smaller than the shape so the cardboard base would remain visible.
5. Coller le papier à motif, puis assembler les côtés de la boîte avec de la colle très résistante. * J’ai maintenu les petites bandes ensemble à l’aide de trombones, le temps que la colle sèche. 5. Glue the patterned paper, then assemble the sides of the box using heavy-duty glue. * I kept the small strips together using paper clips, while the glue was drying.
6. Insérer et coller la base du dessous.
6. Insert and glue the bottom piece.
Poignée et fermoir / Handle and clasp :
Il y a plusieurs options, mais dans ce cas-ci, j’ai percé mes trous avec le Crop-A-Dile II puis j’ai utilisé de la cordeline en guise de poignée. There are several options, but in this case, I punched holes with my Crop-A-Dile II, then I used paper-covered wire as a handle.
Sur le dessus, j’ai tracé un demi-cercle et une fente en dessous pour pouvoir fermer la boîte.On top of the box, I traced a semicircle and a slot below in order to close the box.
Alors voilà, il ne vous reste qu’à fabriquer de jolis biscuits chinois/ « fortune cookies » avec des petits mots à l’intérieur / Now all you need are fortune cookies, with your own message inside :
- Souhaits d'anniversaire / Birthday Wishes;
- Souhaits pour l’année à venir / Wishes for the coming year;
- Mots doux pour tous les jours / Sweet words for every day;
- etc. !
Le tutoriel des biscuits chinois se trouve sur le blog de Hambly Studio Screen Print.
The fortune cookies tutorial is on Hambly Studio Screen Print blog.
Bonne journée à tous !!
Have a good day !!
Matériel/Supplies :
Papiers/Papers :
Carton Bazzill / Bazzill cardstock
October Afternoon - Thrift Shop
Autre/Other :
ruban/ribbon, cordeline
jeudi 12 août 2010
L'arrivée d'Élodie
Par Annie
Une page, tout en simplicité et en douceur, pour recréer l'ambiance de cette arrivée. A layout, in simplicity and sweetness, to re-create the atmosphere of this arrival.
Matériel/Supplies :
Papiers/papers : October Afternoon, Cosmo Cricket
Étiquette/Tag : October Afternoon
Fleurs/Flowers : Prima
Perles/Pearls : Kaiser
Autres/others: Doilies, ruban/ribbon
Une page, tout en simplicité et en douceur, pour recréer l'ambiance de cette arrivée. A layout, in simplicity and sweetness, to re-create the atmosphere of this arrival.
Matériel/Supplies :
Papiers/papers : October Afternoon, Cosmo Cricket
Étiquette/Tag : October Afternoon
Fleurs/Flowers : Prima
Perles/Pearls : Kaiser
Autres/others: Doilies, ruban/ribbon
mercredi 21 juillet 2010
I can't stop!
Par Annie
Matériel/Supplies :
Papiers/papers :
October Afternoon - Thrift Shop
Ornements/embelishments :
Autollants/stickers - October Afternoon
Ruban/Ribbon - Tim Holtz
Lettrage/Alpha :
October Afternoon - Thrift shop
Basic Grey - Lime Rickey
Autres/Others :
crayon noir Sharpie, brads
Matériel/Supplies :
Papiers/papers :
October Afternoon - Thrift Shop
Ornements/embelishments :
Autollants/stickers - October Afternoon
Ruban/Ribbon - Tim Holtz
Lettrage/Alpha :
October Afternoon - Thrift shop
Basic Grey - Lime Rickey
Autres/Others :
crayon noir Sharpie, brads
mardi 6 juillet 2010
Utiliser la Cuttlebug
Par Annie
Est-ce que vous connaissez la Cuttlebug? Il s’agit d’une merveilleuse petite machine qui permet d’embosser et de faire des découpes! C’est un outil vraiment simple d’utilisation. Do you know the Cuttlebug? It’s a wonderful little machine that can emboss and cut shapes! It’s really easy to use.
En voici quelques exemples :
Let's start with the embossing plates.
There are different sizes: rectangular, borders and shapes with differents patterns.
Here are some examples:
Pour faire l’embossage avec les matrices Cuttlebug il faut faire le montage suivant :
To emboss with the Cuttlebug dies, you must do the following montage:
1. Plaque A / A Plate
2. Plaque B / B Plate
3. Matrice d’embossage avec le carton à l’intérieur / Embossing folder with the paper inside
4. Plaque B (2eme) / Plate B (2nd)
Il suffit d’insérer ce « sandwich » dans la Cuttlbug et de tourner la manivelle pour le faire traverser par l’ouverture. Simply insert the sandwich in the Cuttlebug and turn the crank to get it through the machine.
Idées d’embossage en images :
Embossing inspiration:
Fonds pour cartes / Card backgrounds :
Étiquettes / Tags :
Fleurs (de type Prima ou poinçonnées) / Flowers :
Lettrage / Alphas :
Découpes de formes diverses (nuages, cœurs, papillons, inchies …) / Die-cuts of various forms (clouds, hearts, butterflies, inchies, ...) :
Réaliser des découpes avec les Spellbinders/Nestabilities :
Making cuts with Spellbinders / Nestabilities:
Les Spellbinders sont plus minces que les matrices d’embossage ou de découpes de marque Cuttlebug. Il faut donc changer la façon de monter son « sandwich » avant de le passer dans la machine. The Spellbinders are thinner than the Cuttlebug cutting and embossing dies. You must change the way you make the sandwich before putting it through the machine.
Il faut maintenant dans l’ordre :
You will need:
1. Plaque A (Base) / A Plate
2. Plaque B / B Plate
3. Le carton à couper, *motif vers le haut* (ou l’image étampée) et le Spellbinder par-dessus *dents vers le bas* - Ainsi on peut voir si ce que l’on coupe est bien centré. / The paper, *face-up * (or stamped image), and the Spellbinder over it, *cutting edges down * - That way, you can make sure that your cut is centered.
4. Plaque C / C Plate
Tourner encore la manivelle pour faire passer le « sandwich » dans la Cuttlebug. Vous devriez sentir une légère pression lorsque vous tournez ***. Une fois passé, votre carton sera découpé parfaitement. Turn the crank again to get the sandwich in the Cuttlebug. You should feel a slight pressure when you turn ***. Once it's out of the machine, your cardstock will be cut perfectly.
* Découper avec les Spellbinders laisse des marques sur la plaque C, donc ne vous inquiétez pas.
* Cutting with Spellbinders will leaves marks on the C plate, so don't worry.
*** Si en tournant, vous rencontrez plus de résistance, c’est que votre sandwich est trop épais. Cela peut endommager la machine, voir même fendre les plaques de la Cuttlebug. Enlever immédiatement le montage et en réduire l’épaisseur avant de le passer complètement.
*** If when you are turning you feel more resistance, your sandwich is too thick. This can damage the machine, or even split the Cuttlebug plates. Immediately remove the sandwich and reduce its thickness before trying again.
L’embossage avec les Spellbinders/Nestabilities :
Embossing with Spellbinders/Nestabilities:
Voici une des façons de faire (c’est celle que j’ai préféré parmi toutes celles que j’ai essayées) :
Here's one way to do it (it's the one I preferred among all of those that I tried):
1. Plaque A / A Plate
2. Plaque B (en garder une sans marque de coupe pour éviter le marquage lors de l’embossage)
B Plate (without cutting marks on it, to avoid marking during embossing)
3. Le carton découpé emboîté dans son Spellbinder * Cette fois, motif vers le bas – dents vers le haut *
The paper nested in the Spellbinder * This time, face-down and cutting edges up *
4. Tapis d’embossage Spellbinder / Spellbinder embossing mat
Alternatives : une feuille de foam d’environ 2mm d’épaisseur ou un tapis de rubber acheté en quincaillerie.
Alternatives: a sheet of foam of about 2mm thick, or a rubber mat purchased in a hardware store.
5. Cartons (Le nombre peut varier selon votre choix du tapis d’embossage. Chez moi, avec une feuille de foam, j’ai pris 3 cartons 5x7 un peu plus épais que du Bazzill. Certains en auront besoin que de 2 ou d’autres 4… il faut ajuster l’épaisseur simplement pour que ça fonctionne – sans forcer!).
5. Cardstock (The number you will need may vary depending on your choice of embossing mats. For me, with a sheet of foam, I took three 5x7 cardstock pieces, slightly thicker than Bazzill. Some peoples will need 2 and other 4 ... you simply adjust the thickness to make it work - without forcing!).
6. Plaque B / B Plate
Insérer le sandwich, tourner la manivelle et observer le résultat !
Insert the sandwich, turn the crank and watch the results!
Tutoriel vidéo sur YouTube pour voir exactement le procédé : Embossing with Nestabilities
Video tutorial on YouTube to see exactly the process: Embossing with Nestabilities
Quelques exemples de réalisations avec les Spellbinders/Nestabilities :
Some examples of projects with Spellbinders / Nestabilities :
Est-ce que vous connaissez la Cuttlebug? Il s’agit d’une merveilleuse petite machine qui permet d’embosser et de faire des découpes! C’est un outil vraiment simple d’utilisation. Do you know the Cuttlebug? It’s a wonderful little machine that can emboss and cut shapes! It’s really easy to use.
Pour utiliser la Cuttlebug, il suffit de réaliser des « Sandwichs » à partir des plaques fournies avec la machine. Il y en a 4 en tout, de différentes épaisseurs, pour les différentes utilisations (embossage ou découpe). To use the Cuttlebug, simply create "sandwiches" from the plates supplied with the machine. There are four in all, all of different thicknesses for different uses (embossing or cutting).
Une plaque A (la base) / A plate (base)
Deux plaques B / Two B plates
Et une plaque C / And one C plate
Commençons avec les plaques d’embossage.
Il existe différents formats : des rectangulaires, des bordures et des formes ayant divers motifs. Une plaque A (la base) / A plate (base)
Deux plaques B / Two B plates
Et une plaque C / And one C plate
Commençons avec les plaques d’embossage.
En voici quelques exemples :
Let's start with the embossing plates.
There are different sizes: rectangular, borders and shapes with differents patterns.
Here are some examples:
Pour faire l’embossage avec les matrices Cuttlebug il faut faire le montage suivant :
To emboss with the Cuttlebug dies, you must do the following montage:
1. Plaque A / A Plate
2. Plaque B / B Plate
3. Matrice d’embossage avec le carton à l’intérieur / Embossing folder with the paper inside
4. Plaque B (2eme) / Plate B (2nd)
Il suffit d’insérer ce « sandwich » dans la Cuttlbug et de tourner la manivelle pour le faire traverser par l’ouverture. Simply insert the sandwich in the Cuttlebug and turn the crank to get it through the machine.
Idées d’embossage en images :
Embossing inspiration:
Fonds pour cartes / Card backgrounds :
(Sarah)
Étiquettes / Tags :
(Murdock)
(Ellen)
Fleurs (de type Prima ou poinçonnées) / Flowers :
Lettrage / Alphas :
(Ellen)
Découpes de formes diverses (nuages, cœurs, papillons, inchies …) / Die-cuts of various forms (clouds, hearts, butterflies, inchies, ...) :
Réaliser des découpes avec les Spellbinders/Nestabilities :
Making cuts with Spellbinders / Nestabilities:
Les Spellbinders sont plus minces que les matrices d’embossage ou de découpes de marque Cuttlebug. Il faut donc changer la façon de monter son « sandwich » avant de le passer dans la machine. The Spellbinders are thinner than the Cuttlebug cutting and embossing dies. You must change the way you make the sandwich before putting it through the machine.
Il faut maintenant dans l’ordre :
You will need:
1. Plaque A (Base) / A Plate
2. Plaque B / B Plate
3. Le carton à couper, *motif vers le haut* (ou l’image étampée) et le Spellbinder par-dessus *dents vers le bas* - Ainsi on peut voir si ce que l’on coupe est bien centré. / The paper, *face-up * (or stamped image), and the Spellbinder over it, *cutting edges down * - That way, you can make sure that your cut is centered.
4. Plaque C / C Plate
Tourner encore la manivelle pour faire passer le « sandwich » dans la Cuttlebug. Vous devriez sentir une légère pression lorsque vous tournez ***. Une fois passé, votre carton sera découpé parfaitement. Turn the crank again to get the sandwich in the Cuttlebug. You should feel a slight pressure when you turn ***. Once it's out of the machine, your cardstock will be cut perfectly.
* Découper avec les Spellbinders laisse des marques sur la plaque C, donc ne vous inquiétez pas.
* Cutting with Spellbinders will leaves marks on the C plate, so don't worry.
*** Si en tournant, vous rencontrez plus de résistance, c’est que votre sandwich est trop épais. Cela peut endommager la machine, voir même fendre les plaques de la Cuttlebug. Enlever immédiatement le montage et en réduire l’épaisseur avant de le passer complètement.
*** If when you are turning you feel more resistance, your sandwich is too thick. This can damage the machine, or even split the Cuttlebug plates. Immediately remove the sandwich and reduce its thickness before trying again.
L’embossage avec les Spellbinders/Nestabilities :
Embossing with Spellbinders/Nestabilities:
Voici une des façons de faire (c’est celle que j’ai préféré parmi toutes celles que j’ai essayées) :
Here's one way to do it (it's the one I preferred among all of those that I tried):
1. Plaque A / A Plate
2. Plaque B (en garder une sans marque de coupe pour éviter le marquage lors de l’embossage)
B Plate (without cutting marks on it, to avoid marking during embossing)
3. Le carton découpé emboîté dans son Spellbinder * Cette fois, motif vers le bas – dents vers le haut *
The paper nested in the Spellbinder * This time, face-down and cutting edges up *
4. Tapis d’embossage Spellbinder / Spellbinder embossing mat
Alternatives : une feuille de foam d’environ 2mm d’épaisseur ou un tapis de rubber acheté en quincaillerie.
Alternatives: a sheet of foam of about 2mm thick, or a rubber mat purchased in a hardware store.
5. Cartons (Le nombre peut varier selon votre choix du tapis d’embossage. Chez moi, avec une feuille de foam, j’ai pris 3 cartons 5x7 un peu plus épais que du Bazzill. Certains en auront besoin que de 2 ou d’autres 4… il faut ajuster l’épaisseur simplement pour que ça fonctionne – sans forcer!).
5. Cardstock (The number you will need may vary depending on your choice of embossing mats. For me, with a sheet of foam, I took three 5x7 cardstock pieces, slightly thicker than Bazzill. Some peoples will need 2 and other 4 ... you simply adjust the thickness to make it work - without forcing!).
6. Plaque B / B Plate
Insérer le sandwich, tourner la manivelle et observer le résultat !
Insert the sandwich, turn the crank and watch the results!
Tutoriel vidéo sur YouTube pour voir exactement le procédé : Embossing with Nestabilities
Video tutorial on YouTube to see exactly the process: Embossing with Nestabilities
Quelques exemples de réalisations avec les Spellbinders/Nestabilities :
Some examples of projects with Spellbinders / Nestabilities :
(Sheree)
(Debbie)
Voilà!
Beaucoup d'exemples sont sur des cartes, parce qu'on voit bien le résultat. Il est aussi possible d'intégrer tout ça à des pages 12x12 (fleurs, étiquettes de journaling, mattage photo, etc.!) / Many examples are on cards because we can clearly see the result. It's also possible to integrate these techniques in 12x12 layouts (flowers, journaling tags, mattage photo, etc.. ")
jeudi 17 juin 2010
Summer Time
Par Annie
Une page pour se mettre dans l'ambiance, avec une photo de moi l'été dernier :
A layout to celebrate the arrival of summer, with a picture of me last year:
Matériel / Supplies :
Papier/Paper : Studio 2 Mers
Retailles : October Afternoon, Basic Grey
Lettrage/Alphas : Pink Paislee, Prima
Fleurs/Flowers : Prima
Boutons/Buttons : Buttons Galore, Kimmieprout
Pierres et perles/ Rhinestone and pearl : Prima, Kaiser
Une page pour se mettre dans l'ambiance, avec une photo de moi l'été dernier :
A layout to celebrate the arrival of summer, with a picture of me last year:
Matériel / Supplies :
Papier/Paper : Studio 2 Mers
Retailles : October Afternoon, Basic Grey
Lettrage/Alphas : Pink Paislee, Prima
Fleurs/Flowers : Prima
Boutons/Buttons : Buttons Galore, Kimmieprout
Pierres et perles/ Rhinestone and pearl : Prima, Kaiser
lundi 31 mai 2010
9 mois dans le ventre de maman
Par Annie
Voici le mini-album que j'ai réalisé avec le kit Pink Plum de Crate Paper. Je l'ai offert à ma belle-soeur samedi dernier lors de son Shower.
Here is the mini-album I made with the Pink Plum kit from Crate Paper. I offered to my sister-in-law on her baby shower last Saturday.
Matériel / Supplies :
Papiers/Papers :
Pink Plum - Crate Paper
Cartons Bazzill
Embellissements/Embellishments :
Fleurs Prima
Perles Kaisercraft
Découpes - Crate Paper Pink Plum (incluses dans le kit)
Chipboards - Maya Road, American Craft
Lettrages/Alphas :
Doodlebug
American Craft
Pink Paislee
Basic Grey
October Afternoon
Outils/Tools :
Bind-it-all V0.2
Boudins 3/4 po.
Autre/Other :
Peinture Pébéo, punch bordure, rubans, acétate.
Voici le mini-album que j'ai réalisé avec le kit Pink Plum de Crate Paper. Je l'ai offert à ma belle-soeur samedi dernier lors de son Shower.
Here is the mini-album I made with the Pink Plum kit from Crate Paper. I offered to my sister-in-law on her baby shower last Saturday.
Matériel / Supplies :
Papiers/Papers :
Pink Plum - Crate Paper
Cartons Bazzill
Embellissements/Embellishments :
Fleurs Prima
Perles Kaisercraft
Découpes - Crate Paper Pink Plum (incluses dans le kit)
Chipboards - Maya Road, American Craft
Lettrages/Alphas :
Doodlebug
American Craft
Pink Paislee
Basic Grey
October Afternoon
Outils/Tools :
Bind-it-all V0.2
Boudins 3/4 po.
Autre/Other :
Peinture Pébéo, punch bordure, rubans, acétate.
Inscription à :
Articles (Atom)